Translate

Friday, July 31, 2020

Mama's Quilt

A few months ago my Mom began cutting out fabric leaves for an appliqued leaf quilt.  At the age of 99 Mama still loves looking at fabric and thinking about quilts..  She enjoys cutting fabric from templates and at one time cut out enough patches to make 3 dresden plate quilts!  Over her lifetime Mama made a quilt (or two) for each of her 5 children, and one for each of her 12 grandchildren.  This doesn't include the baby quilts she made when the grands were born....
My sisters and I love when she starts cutting quilt pieces and we know she really doesn't want to do much sewing anymore so we are happy to take over and help her get her quilt finished.  

This is how the quilt started.  My sister, Irene, sent this image to us while she was at Mama's and said she thought this is sort of what she imagined the quilt to look like.  Irene provided the backing, cut out the sashing, the white squares for the background and white fabric squares for the sashing....

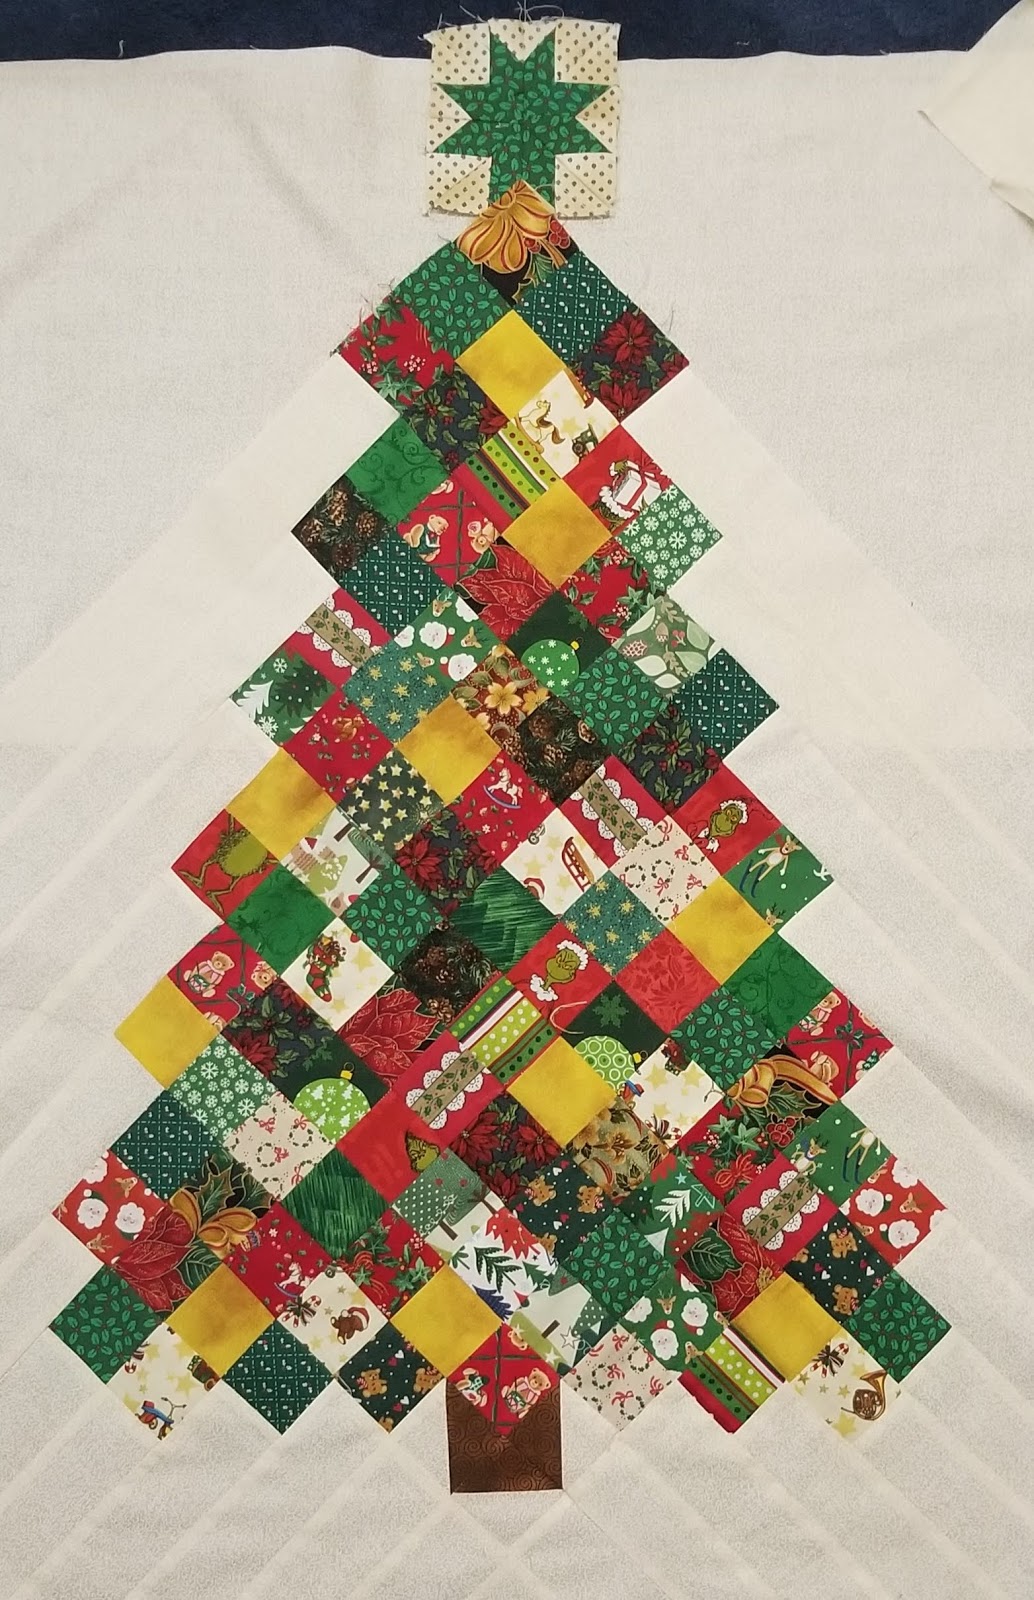
I am not the greatest at applique so when I came to see Mom on my next visit I sewed the sashing together and made 2 groups so they would be ready when my Sister, Lynette, (who is great with applique!) came to visit Mama.........


Lynette appliqued all the flowers down and so then it was my turn again.  I told them I would sandwich and do the quilting if Irene did the binding. (yeah, binding is another thing I haven't perfected yet...but Irene has!) 

So this week I am visiting Mom again so I brought some batting with me and managed to get all my part done so now the quilt waits for Irene's magic!


Tuesday, July 28, 2020

WOOFA finish, one in progress, and another on the back burner....

I got the Christmas Tree Wallhanging finished and am about half done with the Vintage Quilt repair..........

I ended up using some green felt from my stash for the backing of the Christmas Tree Wallhanging and then found some large white Rick-Rack to cover the edges.  I am really happy with how this turned out.....Check!


The Vintage Quilt repair is still in progress but about halfway there............


and the T-shirt quilt is ready and waiting on the sidelines.....


Thank you, Cheryl, for getting us motivated by sponsoring the WOOFA Challenge!  Click on the link to visit Cheryl's page and to see other finishes.


Wednesday, July 22, 2020

Have you Ever???

Have you ever looked back at your old posts and thought to yourself...."what???"..........

It all started out when I began trying to organize my gmail account where all my blog comments go before being forwarded to my aol account......I had umpteen thousand "unread" emails, junk emails, etc but what was interesting were some email comments leading to posts in 2012 that showed photos of my stash back then and would you believe I still have fabric in my stash today from 8 years ago???  Welp.....

While meandering down "nostalgia lane" I also saw the various stages my sewing studio has taken since I moved it upstairs from my guest bedroom that I would like to share with you.... On the left is the original configuration I started with the white cabinets....

After replacing my 1st embroidery machine with a larger hoop model, I turned the last two cabinets on the right end sideways onto the adjacent wall, added cubbies to the front for extra storage and books then installed a wider table top to accommodate the much larger machine... 

I also stacked a couple more drawers on the cabinet on the far left, which contains all my lace, selvages, precuts and other various "necessities".....I bought those white closet cabinets years ago when my kids were living upstairs and have always just moved them when I needed to change things....

Below is a view from the front of the embroidery station with all my embroidery spools and hoops on the wall....you can also see my fabric stash shelves to the right....


The bookshelf I built originally housed quilt and crafting books and a few knick-knacks....until I decided it was better suited as a fabric stash rack....  And my Vintage Singer Treadle replaced the computer desk as a sewing table....to the right of the sewing table you see one of the roll-up shades that covers the big open storage area, which hides  holds my UFO's, batting, felt, Ribbon and sewing notions.


The open storage also holds my other two sewing machines.....and anything else I can stuff in there!


The "open" storage looks much better when the shades are down! lol..........


But I am not able to get as much Kitty assistance when they are shut as when they are open....(thank goodness for sealed containers)


                                                       A couple of years ago I added some more shelving at the top of the fabric stash shelves to put my knick-knacks and serve as a floor to ceiling divider for the loft..... (stairs going down to 1st floor are behind the shelves)


The photo to the right shows the back of the see-through shelves from the top of the stairs.

I moved my design wall from the top of the stairs and placed it on the larger wall in the photo below where it is much better located for viewing and photographs.....

(if you look close you can see a UFO)...my Wizard of Oz project is on my design wall....maybe WOOFA will get me to do something with it this year....

Speaking of UFO's...to the left of the ironing board....on top of the vintage sewing cabinet that contains my old Rockford Sewing Machine is a box containing another UFO... the T-shirt Quilt (I also hope to get done this year).....


....and not to be outdone is my current UFO project....the yellow blob you see rolled up on the stool to the far lower right is the Vintage Quilt I'd better go work on right now!  

I hope I haven't bored you all too much with this VERY LONG post but I got started and just couldn't seem to quit.........til now!  I have some UFO's to work on!


Tuesday, July 14, 2020

Vintage Quilt Repair Halfway done and a tablecloth for Mom

I'm so glad I started working on this old quilt....I wanted to preserve as much of Mom's hand stitching on the edges but in the end I had to take out 2 sides to try to smooth the sandwich as much as possible.
I started out by outlining the Stars but in the end I decided to just do some meandering FMQ and that seems to be working.


It is creating some major puckering on the stars themselves but I think I will just add a tie at the middle of each star when I'm done.....


My Mom has a small rectangular table in her kitchen that she keeps a tablecloth on all the time.  One thing that I know she will use is another tablecloth so anytime I see fabric that looks like I can turn it into one for her I grab it.  Here is one I quickly sewed up yesterday.  Mom will be 99 years old  young tomorrow and it is getting increasingly difficult to find gifts she will actually use but I know she will love and use this bright and cheery tablecover.............


Thursday, July 9, 2020

2 UFO's to do.........

The very first quilt I attempted to make was a disaster.  My Mom and Grandmother and Aunts had always quilted and I had been sewing since I was 8 or 9 years old, took Home Ec. in high school so how hard could it be??

If I had started with something easy like a 9 patch it might have been more successful but I decided to make 12 blazing star blocks with tiny little patches that I had cut with a cardboard template that I made......Well I had no idea what I was doing and after struggling with it for so long I finally gave up and took it to my Mom and asked her to "fix it".  Poor Mama had her hands full.........she did the best she could to fix my mess..........put a backing and batting in it, quilted it and gave it back....I remember giving her just the stars on some because I gave up trying to sew them into the yellow background fabric....in this one the pink is double-knit fabric! (wonder why I had problems)....lol........  


I don't know how she did it but she managed to fix it and my sons used it for years until it started to wear thin in places and the batting was falling out.  I took it apart a few years ago and started patching where I could..... and then it fell into my UFO pile.....until this week when I decided it was time to bring it back. It still doesn't look great and probably never will but I can't bear to part with it...........I can still remember the clothes made out of the same fabrics and I know all the love Mama put into rescuing me.........and my boys loved sleeping with this quilt....so here it is with some new batting started.........


the other UFO I got out is a T-shirt quilt my son asked me to make for him....uhhh....a long time ago........I have cut and backed several of the t-shirts already and at one point had an idea of the layout but I guess I'll have to spread them all out again and see where I am.........

So I think I can finish the old quilt this week or by the middle of next week and get at least a good start on the T-Shirt quilt if I don't let another sewing kit take my focus.....lol........

On my list now for July WOOFA challenge


Monday, July 6, 2020

Progress on July WOOFA Project

I'm still wanting to make some more of those little sewing carry-all bags but today I made some progress on my Christmas Tree Wall hanging........the flimsy is done!  But before I got there I was at this place...I had used strips of white on white to fill in the sides of the mini charms and I really wanted to be lazy and just fill in these last two triangle areas with 2 triangular pieces of white on white.... 


but my "not lazy self" wouldn't stand for it so I went ahead and filled in the rest with strips....lol


Then I needed to decide which star to put at the top..........either the 5 point machine appliqued star or the 6 point pieced star??


I went with the 5 point star with gold fabric applique.


So now all I need to do is put a backing on it and I'm done!  Since it's a wall hanging I may just use felt....not sure yet...Does it need a border or should I just let the tree "speak" for itself?


Sunday, July 5, 2020

One more Sewing Carry-all bag and Raggedy Ann loves her new clothes!

I had a fat quarter that I could just envision fussy cutting into the template shape for another sewing carry-all bag so I had to do it........


 This time I moved the scissors case down a bit and I made the drawstring bag larger......I fussy cut one of the flowers from the FQ for the in-the-hoop needle case and used another piece for the scissors case and handles.....I really love how this turned out.


 I met my Sis for a quick in-the-car breakfast this morning, as she was on her way back home after visiting my Mom for a couple of weeks, and gave her the new outfit for her Raggedy Ann.


When she got home she texted me a photo to show me how happy Raggedy Ann is with her new clothes!   Can you believe that little doll is 50 years old??


Ok I still want to make some more sewing cases but next on my sewing table will be the "infamous" Christmas Tree Wall hanging.........lol...........til then.......


Friday, July 3, 2020

A little Sewing Kit and New Clothes for Raggedy Ann

I saw a similar sewing kit that a friend had made and loved it so much but was unable to find the pattern so my friend was so kind to lend me the template and the rest I sort of "made up" by searching for photos of similar kits on the internet.  
I enlarged the template and used ultra-firm double-sided iron-on pellon to give it some firmness so it would stand up nicely and also lined inside and outside with iron-on fleece to give it some softness......
All the embroidery is done by my machine.....I am in awe of my friends who hand embroider so flawlessly....my hand embroidery looks the same now as when my grandmother was teaching me....(I was probably 8 years old at the time.........)

So anyway...............tada! Here it is front and back..........


It opens up to reveal a needle case on one side and a scissors case on the other with a draw-string pouch in the middle for other sewing essentials...Next time I make it I will move the scissors case down a bit so that longer scissors don't stick up so far....


...and I might make the drawstring bag a tiny bit bigger......


and then it folds back up for traveling...the ribbons on the side open easily for the next time you want to use it....

I also finished some new clothes for a Raggedy Ann Doll I made for my little sister sometime around 1970.  Can you imagine not having a change of clothes for nearly 50 years???  Gosh I am getting teary-eyed just thinking about how happy she was with her Raggedy Ann!  ...And even more teary eyed to know that she still has the doll and cherishes it!  Somewhere there is a photo of her playing with that I haven't been able to find....anyway, I will be seeing her on Sunday to have breakfast and give her the new outfit!


Here is a photo I found of us back in the summer of 1968.....


and here we are in 2020!


OK.......I'm ready to start work on my WOOFA project for July now...................