Translate

Friday, October 30, 2020

Last blocks finished for Long Time Gone and a sweet friend.....

I am visiting a week with my sweet Mom again and have worked on a couple of projects while I’m here, including the final blocks for LTG.

I finished the 60 degree triangle blocks....


and the 2nd flying geese block.......


I will start sewing all the blocks together for the flimsy when I get home.

I have been wanting to do something special for my dear DIL for awhile with her sweet little Italian Greyhound, Sophie, who went to Rainbow Bridge a couple of years ago.  I found the perfect EPP pattern on Etsy and edited the pattern to adapt to Sophie's markings....


this was my practice piece, which I texted to my DDIL and apparently I did a good job with the markings because she said she knew right away it was Sophie and that the markings were "spot on"....

I am "rewarding" myself on my WOOFA finishes by starting the new "Sophie Project" soon.....lol....

Don't forget to check out Cheryll's page at "Gone Stitchin" for all the October WOOFA finishes....Click HERE


Wednesday, October 28, 2020

2 October WOOFA finishes...

 First of all I want to thank Cheryll at "Gone Stitchin" for hosting the WOOFA Challenge and helping us all stay motivated to work on and finish those UFO's we have stashed away for "someday"


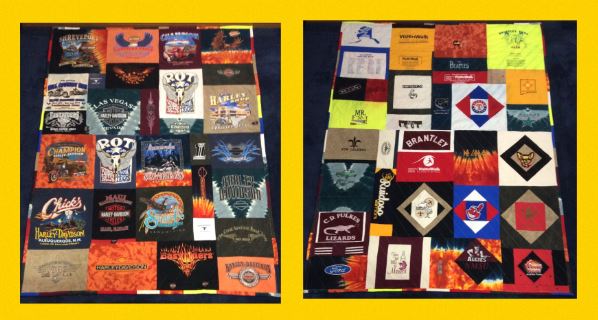
I am happy to report that I was able to get 2 big finishes done this month.....my favorite was the double sided T-shirt quilt I started a few years ago for my son.....


I think these 2 photos that my DDIL sent me say it all....."he loved it!"


My second finish was the Winter Spice Flannel Circles Throw quilt I had started back in 2013.  I have already used it a couple of times to nap on the sofa........


I have started back to work on my WIP "Longtime Gone" and hope to have it finished in November.

Cheryll has a link-up where you can see more finishes.....Click HERE


Friday, October 23, 2020

Winter Spice Flannel Curves (Circles) is done!


I am really great with deadlines....and I definitely subscribe to that quote, "if it wasn't for the last minute nothing would ever get done"...
that's me........
Anyway.....I was really wanting to get the Flannel Circles Rag quilt 
(Sounds better than Flannel Curves Rag quilt, right?) 
finished before I leave to spend a week with Mom and I stayed up til nearly 4 in the morning today and got my finish!

Front....


I decided to go with a scrap-pieced border and originally was going to rag the border too but since the pieces are different sizes from the quilt blocks I thought it would detract from the quilt design so I sewed the border right sides together (except in the corners).

Here's the back.....


I made sure not to touch any of the same fabric on the border to the blocks on the front but really didn't pay attention to the back and I see there are a few on the back that touch but.......ah well....

....I didn't do any additional quilting....thought the circles were plenty since the batting is held in on the seams of each block.


I love the Boho colors in this throw, which measures 51x51 inches........it is ready to accompany me with my sofa lounging......and I can check off one more on my WOOFA challenge list!


Wednesday, October 21, 2020

Halfway there and a new place for gnomes...........

I have half of the flannel squares quilted and sewn together in groups of 4.  This way I'm able to do the quilting in a complete circle and hopefully add more stability to the rag quilt.


These 32 squares are all ready to be sewn together and make one half of the quilt.  After my regular sewing scissors began creating blisters I ordered some rag quilt snippers which will be delivered today.


 Last week my friend Mary Ann posted a link which I was more than elated to try to re-create on this sad tub which I had been unable to grow my ice plant it............


This is a daylight shot.....still not sure if I will leave the solar lights on it as it really has way more lights than needed and looks a bit overdone during the day.....


But is is rather sweet at night........I think I will try to get a different idea for lighting it ......maybe a solar spotlight will work better........


Thursday, October 15, 2020

Winter Spice Flannel Curves....

I started this quilt back in 2013 with some beautiful flannel called "Winter Spice" I purchased at FQS with a gift certificate I had won in 2012...it is on my WOOFA challenge list so I decided to bring it out of the UFO pile.......

...............this was the old layout I had back in 2013 and I had already cut all the patches out and sewed 16  of the 64 squares sewed together RIGHT sides together..... 


my plan had been to make the quilt a rag quilt and after looking at the 16, I wondered "why hadn't I sewed them together with the wrong sides together if I was making a rag quilt?"

In checking back at old posts apparently at the time I was afraid the quarter inch seam would come apart after clipping it so it would fray....


hmmmmmmm....well....the seam ripper and I had a little conversation and decided that wouldn't happen so we un-did the seams then I re-sewed them again this time with wrong sides together...clipped them and decided they will be just fine.


The templates I used are Elisa's Crazy Curves templates, which really are just Drunkard's Path templates....but I do remember I was able to cut 4 layers at a time so I was happy about that..........

So, as I said, this project is on my WOOFA list....and it is going pretty fast now so ....I think I will be able to add it to my October finishes..........


Saturday, October 10, 2020

Of Silk Purses and Sow's Ears...............

 I thought I would show you the latest on the Sow's Ear to Silk Purse swap............

I made another sewing carry-all with the unloved fabric I got from Barbara.........Barb loves everything Native American so I did this for her...


 the multi-colored stripe is the "sow's ear" fabric Barb sent.........I had the Native American Print, which just happened to match perfectly.  


Both sides have the Kokopelli machine embroidery emblem, which I carried on onto the Needle book and I have made a new pattern template for each one I've done, depending on the fabric and design I decide on......I was trying to make this one look like a Native American Pot but it sort of turned out just looking like a little bag.....lol...


I am so glad my lovely friend, Shez, made one of these earlier in the year and I took the idea from her....thanks again Shez!


Thursday, October 8, 2020

Done! Done! and Done!

 I am soooooooooooo happy!! Got the quilting done, sewed all the sections together and put the binding on the T-shirt quilt.  Here it is, front on the left and back on the right.


 I used T-shirt scraps and sewed them together to make the binding...........I am really pleased with how it worked out...........I used the decorative stitch that looks like the one you see on baseballs......and I am happy with both sides.........


 With T-shirts on both sides plus all the t-shirts had stabilizer I didn't add any more batting.........the quilt measures 63" x 82".......


....and weighs over 6 pounds!

I did have a couple of hiccups........first I decided to wash the top half to ensure that the water soluble in pen marks would be gone and I am so glad I did.  I knew some of the Tye-dyed T-shirts were bleeding when I ironed on the stabilizer with hot steam so I used ice cold water and the tye-dyed colors still ran like they were in a high stakes race!  


I was able to take some of the stains out but the top half does have some visible....but I don't think it is too bad....close up is noticeable...but over-all it doesn't look as bad as the photo above and thankfully the bleeding only shows on the back side......and I'm sure from an airplane or a fast moving train the stains aren't noticeable at all!
......but, seriously, I will now be sure to let my son know that it can only be dry cleaned....I don't think I would have mentioned it if I hadn't tried to wash it first....... 
 
I also had a little trouble when I sewed the top section to the bottom section and had to re-sew it so the top stitching on the back side looked better......but other than that for my first T-shirt quilt.......I'm happy with the results.


So I am ready to package it up and send it to my son.............I'm so excited to hear his reaction when he gets it........he has been waiting awhile for me to get this done and I really think it will be a big surprise...............


Saturday, October 3, 2020

FNWF and Wow! This is amazing!

 I quilted the first section of my double sided T-shirt quilt today and I am Soooooooo happy with how it went.  I used my quilting foot and did just a simple diagonal stitch spaced a little more than 2 inches apart.

Here is the main side:


....and here is the back side...


I used a variegated blue/white/gray thread on the main side and a variegated gray/white on the back.  I will probably quilt each section in the opposite direction of the section it attaches to.

and here is the Wow!...This is amazing! part of the post.....
I have had this water soluble marking pen for two or three years and I don't think I've ever used it .....til now.......

I started marking my quilting lines with a blue marking pencil when my eyes fell upon this marking pen........I tested it out on a white T-shirt scrap and it came right out when I sprayed it with water!  I didn't even have to rub!........
Here are the quilt lines I marked before spraying with water:


\
..and here they are after spraying with water!


I'm sure I'm probably the only one who didn't realize how wonderful these water soluble pens are but I will certainly take advantage of mine from now on!

I'm linking up with Friday Night With Friends today hosted by lovely Cheryll.........please click on THIS LINK to go see what other friends have done today!